../build-kernel-and-userspace
Build and run a minimal Linux kernel
Published:
Overview
At work, my tech lead recommended going through Understanding the Linux Kernel by Bovet and Cesati. The book covers Linux version 2.6, far behind the upcoming version 6.0, but apparently the book still has a lot of useful information. Given its thickness, the book will take a while to go through. So I decided to get a development environment where I can view and modify the latest Linux kernel to make it more fun.
There are other blogs detailing how to build a Linux kernel. Heck, two are listed in the references down below. However, information is organized and presented differently here.
Milestones
There are 2 milestones:
- Build and run Linux on qemu
- Build and run Linux on qemu with a Busybox userspace
It's also possible to attach a debugger to the running Linux kernel over qemu. I originally planned to learn about it and cover that here, but I changed my mind as this blog got too long. You can learn about kgdb here. FYI, I have no experience using it.
Install qemu
Qemu is the hardware emulator we'll be using. The Linux we build will be running on top of it. To install:
~ sudo apt install qemu qemu-system
I originally attempted to build qemu from source, but it has a lot of dependencies and started becoming a time sink.
Clone Linux, setup local branch
First, clone the Linux repo.
~ git clone https://git.kernel.org/pub/scm/linux/kernel/git/torvalds/linux.git/
This is an excellent test of your download speed.
~ du --max-depth=1 --block-size=GB | grep linux
6GB     ./linux
Then, checkout the tag of the version you're interested in. 5.19 is latest stable so I went with it.
~ cd linux
# alias gco="git checkout"
~ gco v5.19
~ git branch -M 5.19
Build Linux
FYI, the build process is documented in the Linux source tree readme. You can also type make help to get a sense of what's available. The steps I followed are below.
Cleanup (not needed first time)
Get rid of any stale .o files lying around.
This isn't needed since this is our first build, but doesn't hurt to build habits early on.
~ make mrproper
Build a kernel image
The kernel has a lot of features, and you can pick and choose what you want. For example, the kernel has a lot of drivers. You probably only want a couple. Compiling the kernel with all the drivers might even break some functionality. Drivers are just one example. There are also virtualization features, file systems, etc. Lots to configure! Thus, when building the kernel, there is a step where you specify what all features you want before you actually start building the kernel.
Wanting to build the kernel at /home/$USER/linux-build, the O flag (output directory) is specified below.
~ OUTPUT_DIR=/home/$USER/linux/build
# create a kernel build config file, setting as many values
# to no as possible. essentially, disables as many features as possible.
# leads to a lean kernel.
# for the tiniest kernel, use `tinyconfig` instead of `allnoconfig`.
# I have no idea what the difference is.
~ make O=$OUTPUT_DIR allnoconfig
# you can browse kernel config here visually thru a nice UI.
# nothing to enable that's not already enabled for now.
~ make O=$OUTPUT_DIR menuconfig
# build the actual kernel
# replace `8` with however many processors your computer has.
# `cat /proc/cpuinfo | grep processor | wc -l`.
~ make O=$OUTPUT_DIR -j8
The emitted kernel image--the bzImage file--is just a tiny 1.5ish MB.
Milestone: Run Linux on qemu
Now let's try running the built kernel with qemu.
The qemu manpages explain what the various flags do pretty well.
~ OUTPUT_DIR=/home/$USER/linux/build
# `-nographic` essentially means we'll just use the serial console and don't need a gui/display device.
# `-append` makes qemu pass the following string as the kernel command line.
#     It's a way of configuring the kernel during boot:
#     - `console=ttyS0` tells the kernel to use serial port.
#     - `earlyprintk=serial,ttyS0` tells the kernel to send logs to the serial port so we can debug
#        crashes before console code is initialized. Try getting rid of this and check what you see!
# `-kernel` specifies which kernel image to use
#
~ qemu-system-x86_64 -kernel $OUTPUT_DIR/arch/x86/boot/bzImage -nographic -append "earlyprintk=serial,ttyS0 console=ttyS0"
ctrl + a and then x will exit from the console screen. Press ctrl + a and then h to see the help menu and other options.
Anyways, when we run the built kernel via qemu, the kernel panics:
Warning: unable to open an initial console.
List of all partitions:
No filesystem could mount root, tried:

Kernel panic - not syncing: VFS: Unable to mount root fs on unknown-block(0,0)
The next milestone will get rid of the kernel panic.
Get Busybox
Although we have a Linux kernel, we don't have a userspace or a filesystem. We're going to use a memory-backed filesystem (initramfs check this Gentoo link for a sneak peek). Something has to go in the filesystem tho as we don't want to keep our userspace empty.
This is where Busybox comes in. It provides commands like ls, cd, cp, mv, vim, tar, grep, dhcp, mdev (Linux device hotplug events), ifplugd (network link/interface monitoring) all via a small binary. The commands are probably not going to be as feature-rich and configurable as the non-Busybox alternative, but they're sufficient for us.
Check out the README of the busybox source once we download it below to learn more about it.
Go to https://busybox.net/ and grab the latest stable busybox.
As of writing, it's the November 2021 (9 month old) 1.33.2 Busybox.
~ cd ~
~ curl https://busybox.net/downloads/busybox-1.33.2.tar.bz2 --output busybox-1.33.2.tar.bz2
~ tar -xjf busybox-1.33.2.tar.bz2
~ rm -f busybox-1.33.2.tar.bz2
Configure and build Busybox
This is the same process as with the Linux kernel.
Check out the INSTALL file of the busybox source once we download it below to learn more about it.
First, we select our desired Busybox configuration and then we actually build.
~ cd busybox-1.33.2
~ mkdir -pv build
~ OUTPUT_DIR=/home/$USER/busybox-1.33.2/build
# create a .config file w/ a lot of yes's. We're getting
# a lot of Busybox features, probably more than we need.
# I don't know enough to start with an allnoconfig
# and enable only the bare minimum so this is it.
# The built size might be bigger than our 1.5ish MB kernel. Let's see.
~ make O=$OUTPUT_DIR defconfig
# open the config UI
~ make O=$OUTPUT_DIR menuconfig
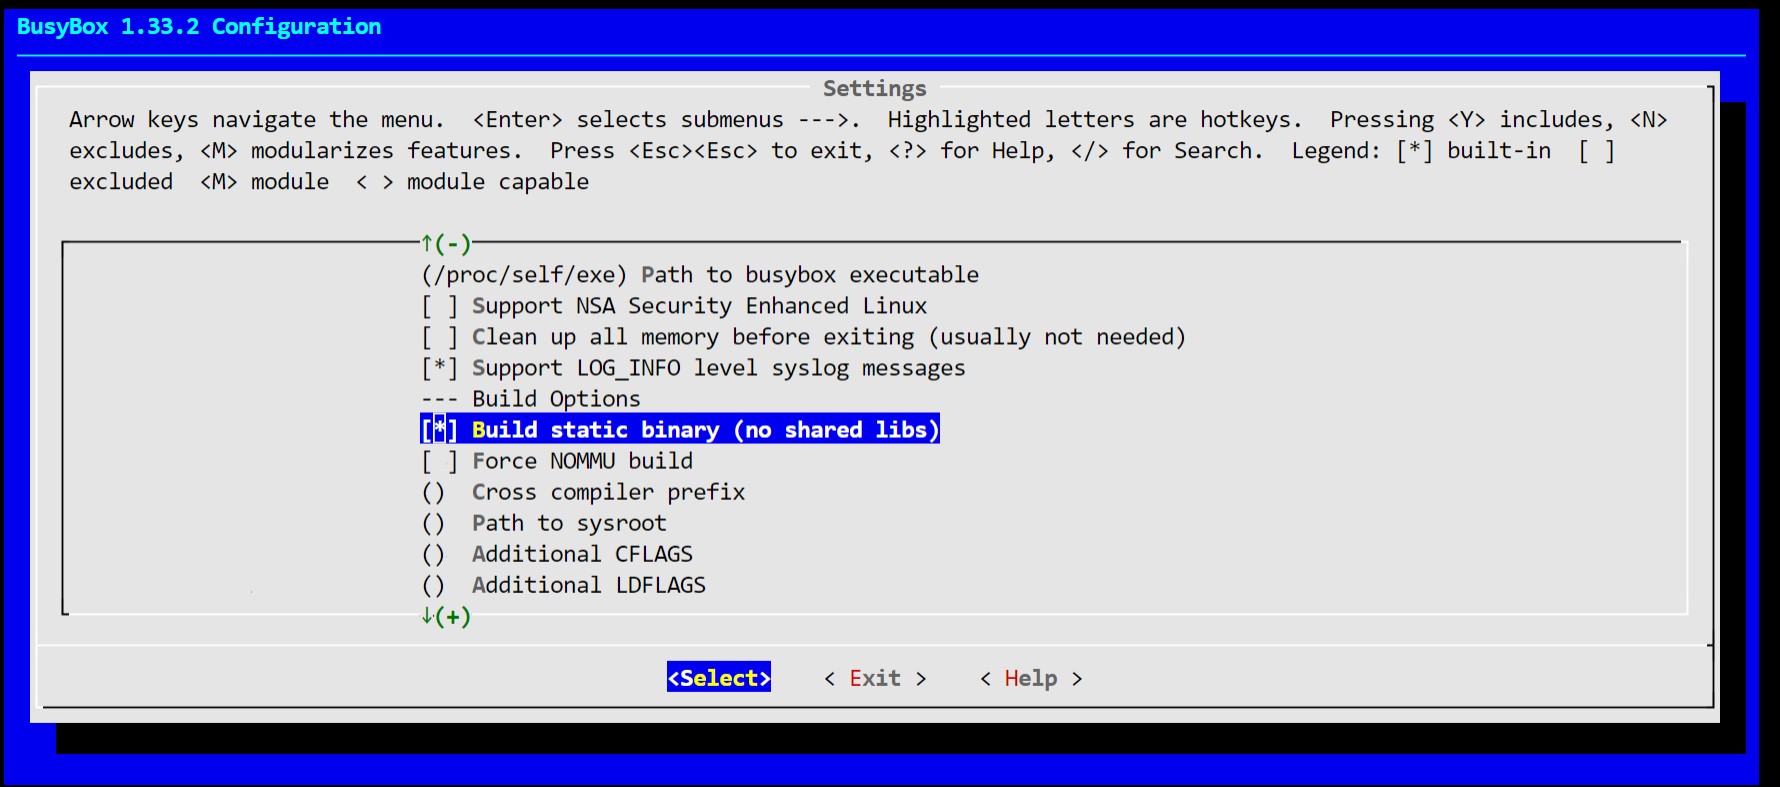
Once config UI is open, select "Settings" (via return) and then "Build Busybox as a static binary" (via space bar). This is because there won't be any shared libraries on the filesystem in our empty kernel userspace to start.
Now, exit out of the menu config and save your changes.
We're ready to start the build!
# type make help to see options here,
# but essentially, we can do `make all` or `make busybox`.
# former also bulds docs. latter only builds busybox.
~ make O=$OUTPUT_DIR -j8 busybox
And yep,
~ ls -la $OUTPUT_DIR --block-size=KB | grep busybox
-rw-r--r--  1 yangwenli yangwenli    2kB Aug 23 15:33 .busybox_unstripped.cmd
-rwxr-xr-x  1 yangwenli yangwenli 2694kB Aug 23 15:33 busybox
-rwxr-xr-x  1 yangwenli yangwenli 2987kB Aug 23 15:33 busybox_unstripped
-rw-r--r--  1 yangwenli yangwenli 2340kB Aug 23 15:33 busybox_unstripped.map
-rw-r--r--  1 yangwenli yangwenli  105kB Aug 23 15:33 busybox_unstripped.out
The busybox binary, what we're interested in, is indeed around 2.7MB, larger than our built kernel.
The busybox_unstripped isn't relevant to us. It's slightly larger and apparently is meant to be inspected by
analysis tools based on the Busybox FAQ.
Create initial directory structure
FYI: Following couple sections are heavily inspired from Gentoo wiki on Custom Initramfs here.
Now, we're going to craft the initial file structure for our Linux userspace.
We're going to want the busybox binary in there for sure. And then also an init process / script to set up our userspace.
~ mkdir /home/$USER/initramfs && cd initramfs
# create some basic directories we want in our Linux userspace
# dev, proc and sys are for kernel-related stuff like procfs, sysfs and devices.
# etc is to store configuration for stuff we might configure in the future.
# root is the place where we'll operate.
# bin is to store excecutables.
~ mkdir {bin,dev,etc,proc,root,sys}
# busybox expects these additional directories as well
# so let's create them for it
~ mkdir {usr/bin,usr/sbin,sbin}
# we want busybox to be included in our initramfs
~ cp /home/$USER/busybox-1.33.2/build/busybox bin/busybox
Create init process
Now, let's create the init process. Inside the initramfs directory, create a file named init
~ touch init && chmod +x init
and populate it with the following:
#!/bin/busybox sh

# Get busybox to create soft links to commands
/bin/busybox --install -s

# Mount the /proc and /sys filesystems.
# You can omit this if you like. Just seemed nice to have.
mount -t proc none /proc
mount -t sysfs none /sys

# Load shell, which should now be soft linked to busybox
exec /bin/sh
Create initramfs cpio
Cpio is an archiver tool, which basically means that it takes a bunch of files and directories and converts them reversibly into just one file. Pretty much like tar. No idea why, but initramfs is specified via cpio so that's what we shall use to pack it up. We shall then compress it using gzip.
~ find . -print0 | cpio --null --create --verbose --format=newc | gzip --best > ./custom-initramfs.cpio.gz
.
./etc
./root
./sys
./dev
./bin
./bin/busybox
./init
./proc
cpio: File ./custom-initramfs.cpio.gz grew, 1310720 new bytes not copied
./custom-initramfs.cpio.gz
7824 blocks
Now we have ourselves the initramfs we're going to use!
Milestone: Run Linux on qemu with Busybox (via initramfs)
Now let's launch the Linux kernel with the initramfs!
We shall take the qemu command from above and add an initrd flag, specifying the initramfs.
~ LINUX_BUILD_DIR=/home/$USER/linux/build
~ INITRAMFS_DIR=/home/$USER/initramfs/custom-initramfs.cpio.gz
# --initrd flag basically ends up getting Linux to use the ramdisk we built
~ qemu-system-x86_64 -kernel $LINUX_BUILD_DIR/arch/x86/boot/bzImage -nographic -append "earlyprintk=serial,ttyS0 console=ttyS0" --initrd $INITRAMFS_DIR
You'll probably see a kernel panic still sadly. And that's because we haven't enabled initramfs support in the kernel, as well as couple other features required to run our userspace.
Small tangent on how the kernel starts the userspace and how it knows where to find init process. In order to kick-off the userspace, the kernel looks for /init, and then /sbin/init, /etc/init, /bin/init and finally /bin/sh in just that order. I've linked to the source. You can also specify the location of the init executable via a kernel command line, as we see here. In our case, we've placed the init file in /bin/init.
Now we go build another kernel after enabling support for initramfs. Repeat steps from above, where we configured and then built the kernel:
~ cd /home/$USER/linux
~ make O=$LINUX_BUILD_DIR menuconfig
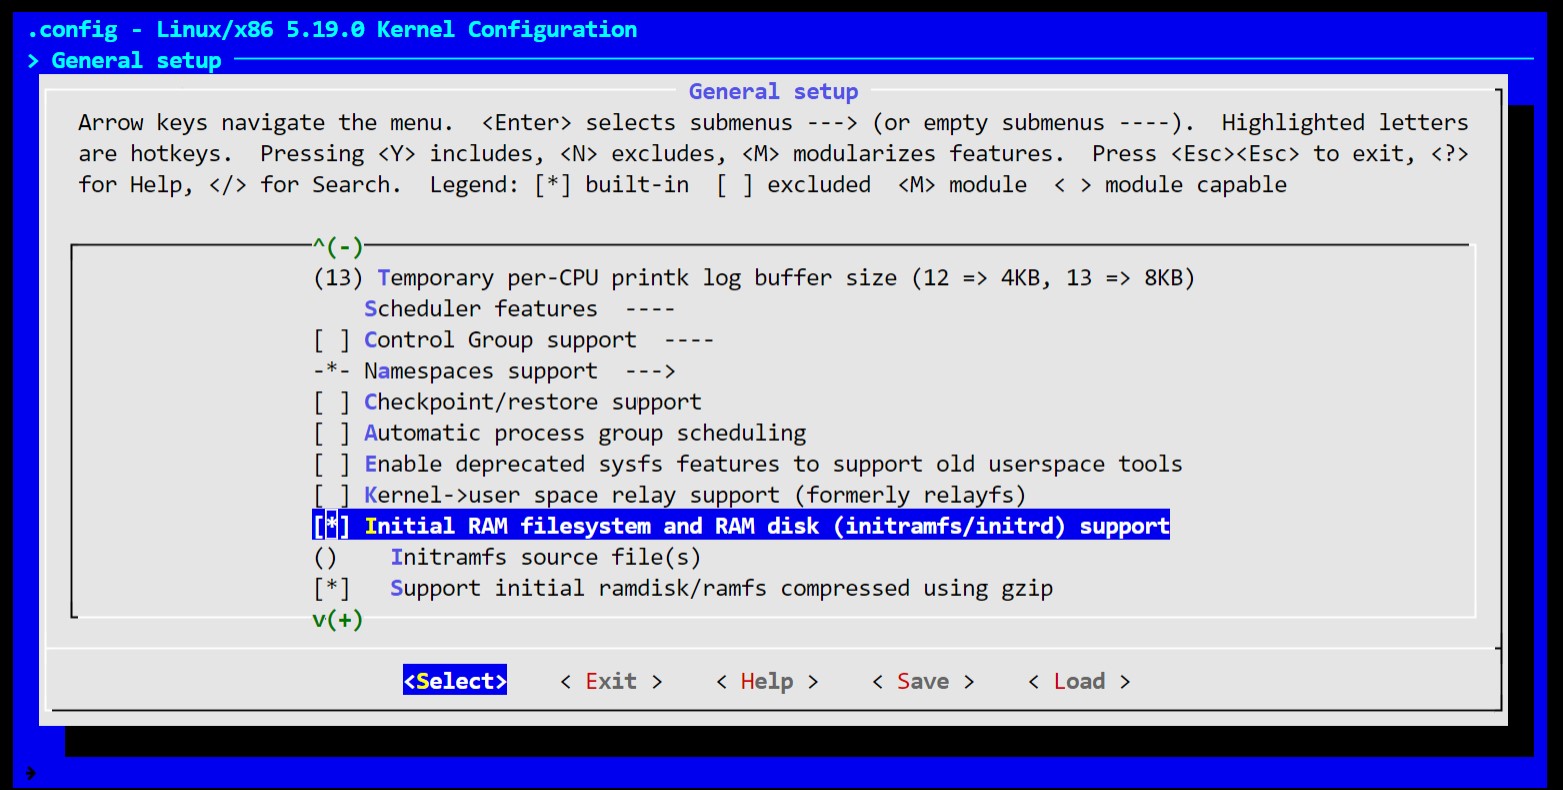
Go to General Setup and then look for Initial RAM filesystem and RAM disk and hit space.
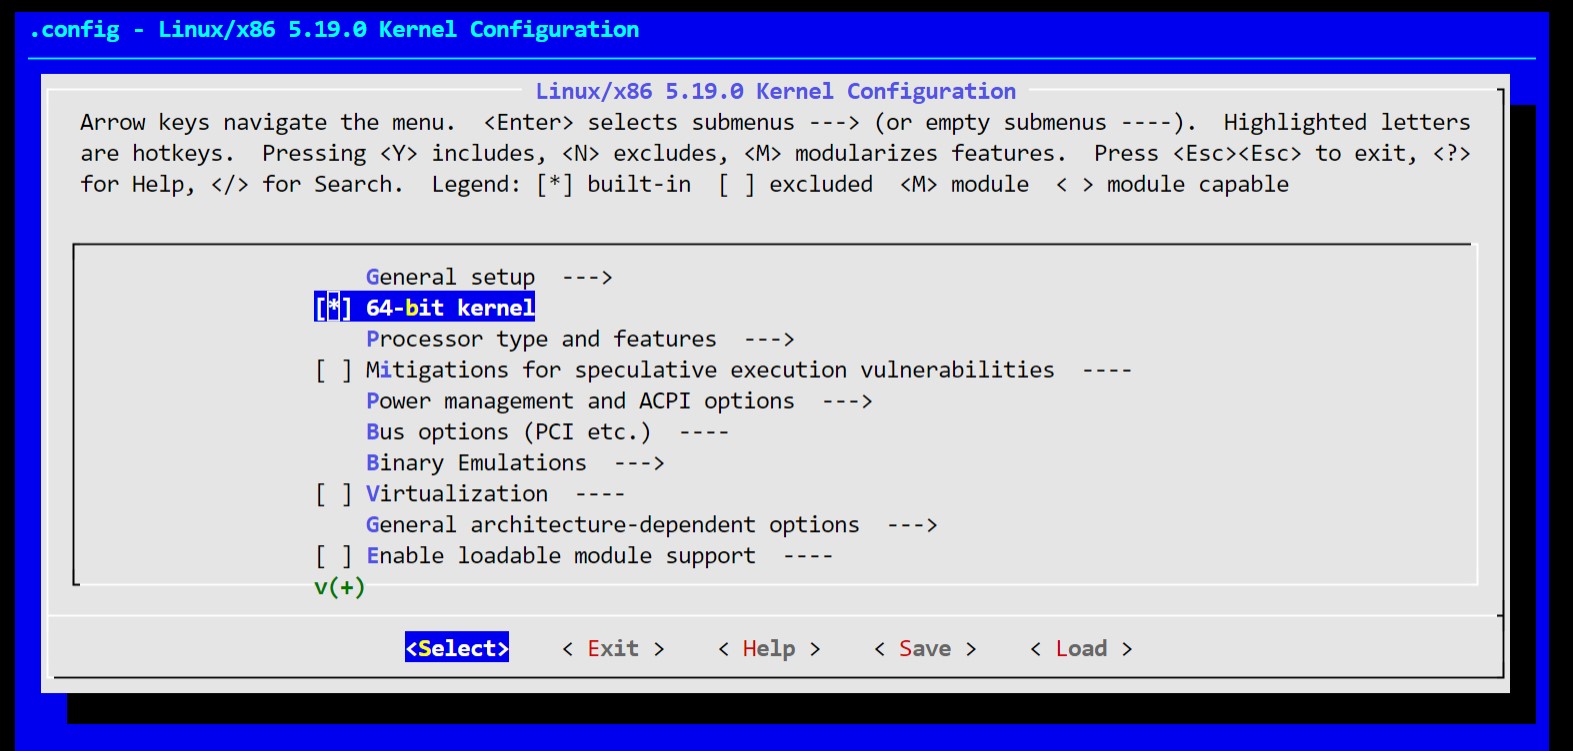
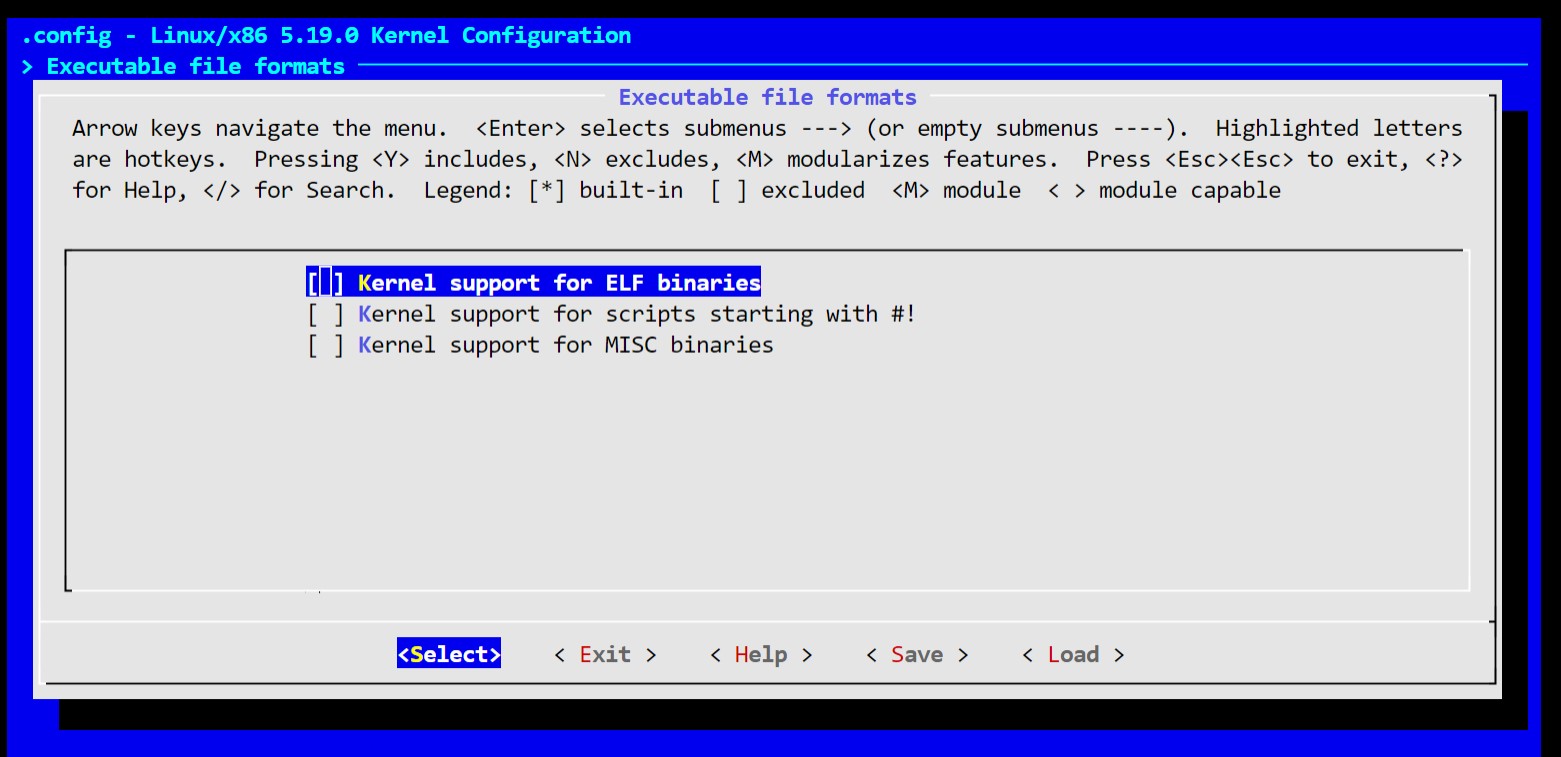
At the top of the config, also enable 64-bit kernel. If you use file command on the Busybox binary, you'll see that it's built for x86_64. You'll also see that it's an elf file so we need to build kernel support for that as well. And since we use shebang (!#) in our init file, we need to ensure support for that too.
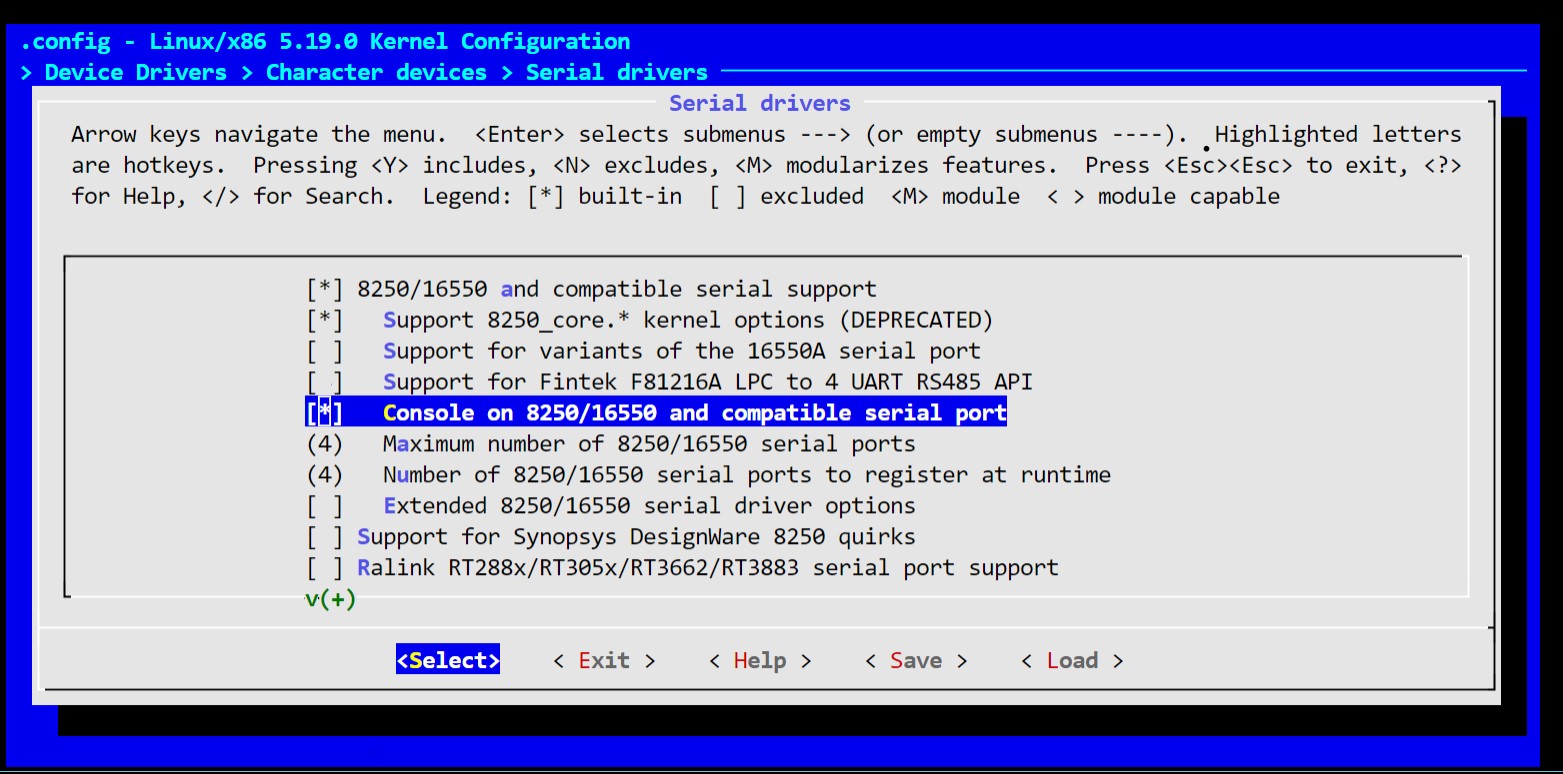
Finally, from the top, go to Device Drivers > Character devices > Serial drivers and 8250/16550 and compatible serial support and Console on 8250/16550 and compatible serial port. These configs are needed to use serial port as console. See docs. init will fail to execute without this change. I think this is cause of the last line exec /bin/sh.
Now build the kernel:
~ make O=$LINUX_BUILD_DIR -j8
And then try running qemu again:
~ qemu-system-x86_64 -kernel $LINUX_BUILD_DIR/arch/x86/boot/bzImage -nographic -append "earlyprintk=serial,ttyS0 console=ttyS0 debug" --initrd $INITRAMFS_DIR
Now we have ourselves a working Linux. If you have a bunch of free time, you could go and build your own distro on top.
References
- Build the Linux kernel and busybox and run them on qemu
- Prepare the environment for developing linux kernel with qemu
- Kernel parameter guide
- Stack Overflow answer about kernel serial console command line
- Linux source tree > Documentation > admin-guide > README
- qemu man page
- Display devices in qemu
- Gentoo wiki > Custom Initramfs
- Linux source tree > Documentation > admin-guide > init.rst
- Kernel.org > Linux Serial Console